Monday, June 29, 2009

How to Stop Annoying “Restart” Prompt after Windows Updates

Windows users can find many things to complain about, but in my opinion, the absolute worst “feature” of Windows XP is the Nagging Restart Dialog. In 2008, Mark showed you how to disable the Windows restart prompt temporarily. I’ll extend on that and make it even simpler for future use.

image

I’m sure you’ve had to deal with this; It pops up every ten minutes after a major system update. Fortunately, it can be turned off. I’m going to help you to create a shortcut that will turn this nag off when double-clicked.

So, how to stop automatic updates from restarting your PC

Step 1

Your first step is to open Notepad. (Start > Run > “Notepad” > OK)

stop automatic updates from restarting

In Notepad, just type the command “net stop wuauserv” (no quotes, as in above). Then close the window, and select “Yes” to save changes.

Step 2

how to stop automatic updates restart

What we’re doing is creating an executable batch file which will run a command when double-clicked, to stop the Windows Automatic Updates Service. Make sure that your “Save as type” is set to “All Files” so that you don’t accidently create a text file. Save your file with an extension of “.bat

Step 3

This cute little batch file is what you’re left with.

image

When Windows starts nagging you to restart, just double click this to run it and stop the service. You won’t be bothered again. The service will restart when you reboot, which is needed to install the updates in the first place.

Is there anything that Windows does that annoys you? Maybe we can find a fix for it. Are yu awrae of any easier way to stop automatic updates from restarting your Windows. Please give us some ideas in the comments.

Sunday, June 28, 2009

How to use Adsense with Coppermine Gallery ?


photogallery-coppermine.jpgThese days Photo Galleries have become integral part of big portals. There are many open source PHP scripts that you can use for integrating photo gallery with your website. For example, we have Gallery, Coppermine, 4Images etc. Out of these I prefer to use CopperMine Photo Gallery. It is the best Photo Gallery PHP script available on internet. For proper installation, it requires PHP, MySQL, and ImageMagick or the GD Graphics Library, and web server software such as Apache. It can be easily integrated with Coppermine Photo Gallery has interfaces with other popular content management systems like e107, Invision Power Board, Joomla!, Mambo, phpBB, PostNuke, PunBB, Simple Machines Forum, vBulletin, Woltlab Burning Board, and YaBB SE. It is an open-source software and is licensed under the GNU General Public License.

But for using coppermine, you must have to add a “Powered by Coppermine” link in your photo gallery. Overall, Coppermine Gallery is a good gallery software. It’s really easy to use, bug free and integrates easily to many popular open source forums. But it is not easy to customize its code, as layout and functions are not properly separated.

You can easily earn a good amount of money through using adsense in your photo gallery. Today I will tell you how to place google adsense codes in your Coppermine photo gallery.

1: Below Header

Below_Header.JPG

For adding 728×90 adsense ad just below the header, you have to find “{ADMIN_MENU}” in the template.html file of your Coppermine template. Then add this piece of code just after “{ADMIN_MENU}”.

<table width=”100%” border=”0″ align=”center” cellpadding=”0″ cellspacing=”0″>
<tr>
<td align=”left” valign=”top”> {ADMIN_MENU}
<table width=”100%” border=”0″ align=”center” cellpadding=”25″ cellspacing=”0″>
<tr>
<td align=”center” valign=”top”>
Your Google Adsense Code
</td>
</tr>
</table>

2 : Adsense Ad around the image.

Adsense_images.JPG

For adding adsense ads around images, you have to edit “themes.inc” file. This file is located in “include” folder of the Coppermine directory.

// HTML template for intermediate image display
if (!isset($template_display_media)) { //{THEMES}
$template_display_media = <<<EOT
<tr>
<td align=”center” class=”display_media” nowrap=”nowrap”>
<table cellspacing=”2″ cellpadding=”0″ class=”imageborder”>
<tr>
<td align=”center”>Your Adsense Code</td>
<td align=”center”>{IMAGE}</td>
<td align=”center”>Your Adsense Code</td>
</tr>
</table>

Find comment containing “intermediate image display”. Just compare the code with the code written above and add “<td align=”center”>Your Adsense Code</td>” just above and below “<td align=”center”>{IMAGE}</td>”.

So, in this way you can easily integrate Adsense with you Coppermine Photo Gallery and monetize your photo website. In case of any confusion, feel free to contact me. You can see the demo of Coppermine on my blog’s photogallery.

To know more about Coppermine and to download it visit http://coppermine-gallery.net/

Technorati Tags: ,,

Saturday, June 27, 2009

How to Convert PDF to an Editable Word Document [Windows]


PDFHEAD This 2.2 MB file sure packs a wallop!

Have you ever had a PDF file that you needed to convert to an editable Word document? Your boss is yelling at you to copy and paste 500 pages from a PDF into a Word document and you are scared that you will have to type this whole document out - fear not MakeUseOf readers, we have a solution for you!

How about copying a block of text or a chart from a PDF to Word or another text editor?

I can assure you that it has been literally torture over the years. There have been a few costly programs that did what I wanted – but even then, it was not done well. I’ve searched for a lot of different programs that would let me convert PDF to an editable Word document in the past, read an older review here.

Now, a free product comes moseying along and does the deed AND WELL!

Let’s take a look at AnyBizSoft’s PDF to Word Converter.
convert pdf to editable word document

You need to download the application and submit your email address to get a free registration code.
pdf2

Without registering, the program will only convert 3 pages. So I gave in and gave them my address. I got an email back quickly with my registration code. Next, you will hit the Register button in the upper right-hand corner next to Help. Put in your email address and serial key. It will thank you for registering and then we can start converting!

Hit the Add PDF button in the middle of the window and point the program towards your PDF file that you want to convert to Microsoft Word. On the bottom of the window are your output settings. I set mine to a custom location but you can also have it save in the same folder as the source by checking the top box.

pdf3

Once you select your PDF, all you have to do is hit the big blue Convert button. That will start your PDF processing. It took about 45 seconds to convert a 5-page PDF that was made up of shaded columns.

pdf4

The program told me it was complete. I hit OK and the Microsoft Word document loaded.

pdf5

The document was so on the money it was scary. Because of some graphics overlapped with lines, there was initially a spacing issue. That was easily corrected – because EVERYTHING WAS EDITABLE!
convert pdf to editable word file

Wow, this is simply awesome!

Technorati Tags: ,

Thursday, June 25, 2009

Rapidshare Search Engines

Technorati Tags: ,

Rapidshare is still one of the most popular file hosting solutions on the Internet although their latest changes to the system have angered many long time users of the service. The reduction of the daily download quota for Rapidshare premium users and the speed decrease for free users are the two main points that have angered many Rapidshare users.

Users have many different options to find files that are hosted on Rapidshare. Some of these methods include the use of specific Google search parameters that will only search Rapidhshare for the files and file types that the user specified in the search.

Other options include so called Rapidshare Search Engines which maintain their own database of files that are hosted at the file hoster. They usually keep the databases up to date and link directly to Rapidshare for easy file access.

There is another type of site that is offering Rapidshare searches, not nearly as effective as the sites that maintain their own database. So called Google custom search engines do nothing else than to combine the advanced search parameters of Google with a custom search engine that is bringing in revenue for the creator of the search engine. They can normally be identified by looking at the search button. If that button states Google Search you know that it is a custom Google search and not a website with its own database.

If you want to find Rapidshare files you can use the following Rapidshare search engines that all use their own database.

Rapidshare Files

  • Rapidshare Search Engine [link]
  • One Click Files[link]
  • Mega Download [link]
  • File Crop [link]
  • Rapid TVPHP [link]
  • Files Tube [link]
  • Rapidzilla [link]
  • RS Rapidshares [link]
  • RS Find [link]
  • Rapidshare Data [link]

It is easy to find hundreds of Rapidshare files search engines on the Internet but most of them provide no benefit over a normal Google search. Those ten websites in the list are unique.

Wednesday, June 24, 2009

StrokeIt (Windows)

Windows only: Donationware application StrokeIt is a global mouse gesture tool for your computer.

If you're not familiar with the concept of mouse gestures, it's simple: by holding down the right-click button and dragging your mouse in a pre-defined fashion, you can execute a user-defined command or action. For example, you could set up a global mouse gesture that launches Lifehacker any time you trace 'L' on your screen. Get the drift? StrokeIt lets you customize commands based on application, and it comes with a ton of pre-baked gestures that you might want to try out to get the hang of it. Mouse gestures are only limited by your imagination to use them, which means this is a potentially very useful tool. StrokeIt is donationware, Windows only. Thanks Jon! — Adam Pash

StrokeIt

Technorati Tags: ,,

5 Famous Geeks Who Never Finished College

I dropped out of college couple of years ago and it was the best decision I ever made in my life.

While I am not as (financially) successful as some of geek drop-outs who inspired me. I have done better (financially) than most of my friends who did graduate from the same college I dropped out from and most importantly I enjoy what I do. Do you need to graduate from a college in order to be successful in life? If you can open a book and read, there is absolutely no reason why you can’t have the same knowledge you will get by graduating from a college. The only difference is a piece of paper that will cost you ~50-100k (if in US) and 4 years of your life.

Ok maybe its a bit simplistic view against college but its not very far from the truth. When I dropped out of college I constantly needed inspiration from success stories of geeks who made it big but never finished college. These are the five successful geek personnel who inspired me the most:


1) Michael Saul Dell:

mdell
Geek Creed: When he was 15 he used to take apart Apple II computers and rebuild it just for the hell of it. He dropped out of University of Texas to run PC’s Limited (now Dell) at the age of 19.


2) Steve Jobs:

apple

Geek Creed: Apple Computers with Steve Wozniak – NeXT Computer – Pixar Animation. Dropped out of Reed College only after one semester.


3) Bill Gates:

D23318-3
Geed Creed: Best known for Microsoft. Dropped out of Harvard to start a software company with Paul Allen. After more than 30 years, Microsoft is still one of the largest software companies in the world.


4) Paul Allen:

allen-300

Geed Creed: Paul Allen was the other half of Microsoft with Bill Gates the same way Steve Wozniak was a partner with Jobs on Apple. He dropped out of Washington State University to work as a programmer.


5) John Carmack:

john-carmack

Geek Creed: Cofounder of id Software and lead programmer of famous games such as Wolfenstein 3D, Quake, Doom. He dropped out of University of Missouri only after 2 years to work as a freelance programmer.


Final Words:

You don’t necessarily have to be a (computer) geek to drop out of college and make it big. There are many successful and famous people who made it big without ever getting a college degree. Yes, some of them got lucky but most of them took proactive steps that put them in the right place at the right time and you don’t need 4 years and a lifetime worth of loans to be there.

Technorati Tags:

10 Must-Have Gadgets

As you may have noticed if you’ve leafed through a SkyMall catalog or walked into a Brookstone store lately, there are a lot of stupid gadgets out there. If someone can make a buck off it, it will be built. (And as the recent bankruptcy of Sharper Image proves, sometimes even that isn’t a prerequisite.) But before you write off the premise of better life through gadgets entirely based on your experiences with an ionic air purifier and a battery-powered margarita blender, take a look at the more practical side of gadgetry. We’ve rounded up a few of the most downright useful technologies out there. If you haven’t already gotten on board with some of them, we’ll try our best to make you reconsider.

Garmin Nuvi 265WTIn-Car GPS Systems
Yes, you already know your way to work and back. And after 20 years in the same city, maybe you know downtown pretty intimately, too. But can you navigate to any address a person gives you based on that knowledge alone? Take off on a spur-of-the-moment road trip and never have to print directions from Google Maps? Immediately find the nearest gas station when your tank is on E in the boonies? We thought not. A GPS can, and with entry-level devices now going for about $100, you have no excuse not to have one handy in the glove box. TomTom’s ONE series ($120+) makes an excellent introductory unit for infrequent users, while a more advanced unit like Navigon’s 8100T ($599) will do just about everything, including show full 3D renderings of the terrain you’re driving through. Garmin’s Nuvi 265WT ($299) is one of our favorite midrange units because it includes free live traffic updates for life.

Apple iPhone & Blackberry BoldSmartphones
We know you love your StarTAC, but it may be time to move on to something a little more sophisticated. Given how many people turn their iPhones into fart machines, “virtual lighters” and other nonsense, it’s easy to dismiss the whole category, but there are plenty of genuinely legitimate applications for these phones too. Consider the time a DT staffer found a car on craigslist, called the seller, used Citysearch to find a mechanic to have it checked out, then put down a deposit in cash by using the Internet to find the nearest ATM. All on a smartphone. And there’s certainly nothing better than calling BS on your trivia-spouting friends when their library of interesting facts turn up to be completely fabricated. For an entertainment phone, an iPhone ($200+) makes an obvious first pick, but frequent text messengers may enjoy the hard keyboard on a BlackBerry Bold ($300) more, and HTC has a promising-looking lineup of Windows Mobile devices coming, too.

Epson Workforce 600All-in-One Printers
You probably won’t realize just how useful one of these combined printer-scanner-fax machines is until you actually own one. Suddenly, faxes are no longer something you have to do from work, copies are a button press away, and any of your most important documents can be copied down digitally in seconds. And if you do some shopping around, most barely cost any more than the standalone equivalent. We recommend Canon’s MX850 ($200) or Epson’s Workforce 600 ($180) if you’re in the market for an inkjet model, and Brother’s MFC-7840W ($270) if you need a laserjet. Samsung’s SCX-4200 is an even more affordable bet, if you can do without fax functionality.

Asus Eee 1000HENetbooks
They say things that are too good to be true usually are, but when it comes to netbooks, you might need to suspend that axiom. For $400, most people wouldn’t believe what a lightweight, compact and versatile machine they can buy. Sure, we may try to shoo a bargain-hunting computer buyer away from a netbook as an only computer simply because they lack every necessary feature. But as a supplement to a desktop, or more capable laptop, they’re absolutely perfect. Frequent travelers will love Asus’ long-lasting Eee 1000HE ($399), which we got to run for over six hours under normal use, while business users may prefer the dressed-up styling of the Eee 1002HA ($429). And for something truly unique, if spendy, Sony’s Vaio P Series ($899) can’t be matched.


Jawbone 2
Bluetooth Accessories
The idea of a “personal area network” sounded needlessly complicated to us first, too. And many older, hard-to-connect Bluetooth devices definitely meet that expectation. But the standard has matured in recent years, and we’ve come to realize how handy Bluetooth accessories can truly be. For hands-free talking, not many companies can match Aliph’s Jawbone 2 Bluetooth headset ($130), which is both extremely good at blocking outside noise and stylish. For music, Jabra’s brand new Halo ($130, available in May) is compact, sturdy, and has a handy detachable stereo cable to make it compatible with non-Bluetooth devices. And if you want to use it for music, try Motorola’s Rokr T505 ($140), which will stream both voice and music through your car’s radio using an FM transmitter.

Digital Cameras
We have grandmothers who have switched to digital, so if you’re still clinging to film, wake up. Besides the appeal of limitless instant photo taking without film or developing fees, there’s always the fact that you can liven up your photos on the computer with the help of Photoshop and other retouching software. Options like Kodak Gallery, Flickr, and Shutterfly make it easy to share shots online, too. Beginners can’t go wrong with one of Canon’s well-respected point-and-shoot cams, like the inexpensive and popular SD1100 ($180). Old-school camera folks will love the retro look and performance of Panasonic’s fantastic DMC-LX3 ($500), while advanced photographers can choose from any number of popular DSLRs. We’ve never found one nicer than Sony’s spendy A900 ($2999).

Western Digital My Passport EssentialPortable Storage
Cloud-based computing may be moving us closer and closer to a world without physical media, but in the mean time, your best bet for moving gigabytes around quickly still lies in thumb drives and external hard drives. On the smaller side of things, we can’t help swooning over iRiver’s Domino thumb drive ($21+), which is so miniscule it’s hard to believe it can carry up to 4GB. Western Digital’s My Passport Essential ($80+) is an equally swank solution for those requiring hard drive space up to 500GB, and if you need to be noticed, Iomega’s eGo leather ($150), which resembles a flask, is sure to perk up some eyebrows.

SanDisk Sansa ClipMP3 Players
For a while, MP3 players may have been a bit of a novelty – like when you could only fit a couple gigabytes on a player that felt like CD player full of lead. But now that you can fit the same amount of music on a player that weighs as much as 10 paperclips, it may be time to reevaluate. The ratio of storage to volume on these players not only blows every other format out of the water, flash-based players are also impervious to shock, and digital music is readily available online from outlets like Amazon and iTunes – both more convenient than a trip to the record store. Apple’s iPod Shuffle ($79) is the reigning size champ at the moment, but we really prefer SanDisk’s slightly larger Sansa Clip models ($40+), which are more practical due to their screens. Most people will instantly leap to Apple’s revered iPod classic line ($249) for larger players, but Microsoft’s latest Zune ($250) deserves a fair shake, too.

Samsung LN46A630HDTVs
We happen to think the quality increase from a standard-def tube television to a 1080p flat-screen is more than enough to call it practical, but in case you’re still skeptical, try hauling a 42-inch CRT up eight flights of stairs to an apartment. Or finding room for one in the same tiny apartment. And while you’re at it, compare your electricity bill running a tube set to the same size LCD. Point taken? Samsung has a reputation for producing some of the nicest flat screens, and among them, we think the LN46A630 is a fine balance between price and features. Sony’s Bravia KDL-52XBR6 ($2,999) has some of the best black level we’ve seen from an LCD, and Pioneer’s Kuro Elite Pro-111FD ($4,500) is pretty much unmatched in picture quality.

Linksys-Cisco WRT54GLWireless Routers
We probably shouldn’t even have to point out that wiring your entire house with CAT5 cable is a monumental pain and an eyesore, so a router that will blanket your entire house in wireless connectivity shouldn’t be a tough sell from the practical angle. But if there’s one factor you have overlooked if you wrote routers off five years ago, it’s this: They’re extremely cheap and extremely fast now. The latest 802.11n standard is fast enough to carry even streaming HD video without breaking a sweat, and you can easily score a box that will do it for under $100. Linksys by Cisco’s WRT160N Ultra RangePlus ($100) is not only an affordable way to unwire your home, it looks sweet, so you don’t have to hide it. Netgear’s own WNR2000 Wireless N router ($80) is even cheaper way to get the Draft-N standard. If speed is of less concern, and you don’t even have 802.11n connectivity in your computer, the WRT54GL (originally $80, now discounted at most retailers) is a tried-and-true solution.

Technorati Tags: ,

Monday, June 22, 2009

Lock Folders Using Notepad

lockerHello.
Have you ever wondered if it is possible to Lock Folder using Notepad?
Well yes it is possible to Lock Folder Without Any Software. This method works fine in Xp/Vista and hopefully upper versions of windows.
Please don't use this method if you are unsure what you are doing, I am not responsible for any damage caused by use of this, though it won't occur if you follow my steps correctly.
Here we start:
Open Notepad from your Start -> All Programs -> Accessories -> Notepad
notepad
01. Copy and Paste the below code in Notepad and Save it as FolderLock.bat

cls
@ECHO OFF
title Folder Locker
if EXIST "Control Panel.{21EC2020-3AEA-1069-A2DD-08002B30309D}" goto UNLOCK
if NOT EXIST Locker goto MDLOCKER
:CONFIRM
echo Are you sure u want to Lock the folder(Y/N)
set/p "cho=>"
if %cho%==Y goto LOCK
if %cho%==y goto LOCK
if %cho%==n goto END
if %cho%==N goto END
echo Invalid choice.
goto CONFIRM
:LOCK
ren Locker "Control Panel.{21EC2020-3AEA-1069-A2DD-08002B30309D}"
attrib +h +s "Control Panel.{21EC2020-3AEA-1069-A2DD-08002B30309D}"
echo Folder locked
goto End
:UNLOCK
echo Enter password to Unlock folder
set/p "pass=>"
if NOT %pass%==type your password here goto FAIL
attrib -h -s "Control Panel.{21EC2020-3AEA-1069-A2DD-08002B30309D}"
ren "Control Panel.{21EC2020-3AEA-1069-A2DD-08002B30309D}" Locker
echo Folder Unlocked successfully
goto End
:FAIL
echo Invalid password
goto end
:MDLOCKER
md Locker
echo Locker created successfully
goto End
:End

folder locker
bat file
02. Now Double Click that new Batch file named FolderLock and it will make a new folder named Locker in the same location:
bat file
bat file
Now put the Data Inside the folder Locker and again Double Click the Batch file to Lock it, this will give you a prompt, just Type y and press Enter:
bat file

To Unlock the Folder just double click the Batch file again and type y and press Enter.

Now keep the Batch File named FolderLock.bat in a different place like your USB Pen Drive so that only you can access the Folder you have locked.
Hope this helps. If you have any question or doubt, please leave a comment and I will get to you as soon as possible and will help you to best possible way.senyum

Install Windows XP using USB Flash Disk/ Flash Drive - Step by Step Guide

Someone in this post (Acer Aspire One Specifications and Windows XP Drivers) ask me to write a tutorial about how to install Windows XP using USB flash disk/flash drive.
If you want to install Windows XP, but your notebook (or PC) has no CDROM, you should install Windows XP using USB Flash disk/Flash Drive/Thumb drive...
just follow this guide :
blogger-emoticon.blogspot.com
step 1:
Buy an USB Flash Drive (at least 2GB).
When you do this tutorial, please make sure your computer/laptop/PC has a CD-ROM (or DVD).
so, now you have 2 computers, with CD-ROM support and without CD-ROM support (e.g Acer Aspire One, Asus EEE-PC).
step 2:
Download this software pack (Komku-SP-usb.exe - Download) 1.47MB
UPDATE 1 :
Anonymous said…
your download at mediafire keeps timing out, any other hosts available?
Mirror Depositfiles
Mirror Rapidshare
Mirror Easy-Share
Mirror Megaupload

this software pack contains 3 application :
-BootSect.exe (Boot Sector Manipulation Tool)
-PeToUSB (http://GoCoding.Com)
-usb_prep8 (Prepares Windows XP Setup LocalSource for Copy to USB-Drive)
step 3:
Double click Komku-SP-usb.exe

a window will appear... and click Install

step 4:
Insert your USB Flash Drive.
When I made this tutorial, I was using 4GB Transcend USB FlashDrive...

Locate folder C:\Komku\PeToUSB\
double click PeToUSB.exe

a window will appear like this...

Destination Drive : select USB Removable
check on Enable Disk Format
check on Quick Format
check on Enable LBA (FAT 16x)
Drive Label : XP-KOMKU (or whatever you want)
then click Start
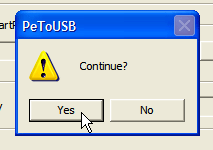
Click Yes to continue....

"You are about to repartition and format a disk. Disk: .... All existing volumes and data on that disk will be lost. Are You Sure You Want To Continue?"
click Yes

Wait a few seconds...

Click OK, and you can close PeToUSB window.
step 5:
Open Command Prompt ...
Click Start > Run > type cmd > click OK

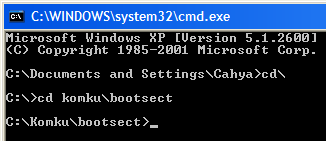
On Command Prompt window, go to directory C:\Komku\bootsect\
how to do this?
first type this cd\ and press Enter

then type cd komku\bootsect and press Enter

the result...

Don't close Command Prompt window, and go to step 6...
step 6:
on command prompt window, type bootsect /nt52 H:

H: is drive letter for my USB Flash Drive, it may be different with yours...
and press Enter
the result... "Successfully updated filesystem bootcode. Bootcode was succesfully updated on all targeted volumes."

don't close Command Prompt window, and go to step 7...
step 7:
now type this cd.. and press Enter

then type cd usb_prep8 and press Enter

type usb_prep8 again... and pres Enter

step 8:
Your command prompt window will look like this

Press any key to continue...
usb_prep8 welcome screen will appear

Prepares Windows XP LocalSource for Copy to USB-Drive:
0) Change Type of USB-Drive, currently [USB-stick]
1) Change XP Setup Source Path, currently []
2) Change Virtual TempDrive, currently [T:]
3) Change Target USB-Drive Letter, currently []
4) Make New Tempimage with XP LocalSource and Copy to USB-Drive
5) Use Existing Tempimage with XP LocalSource and Copy to USB-Drive
F) Change Log File - Simple OR Extended, currently [Simple]
Q) Quit
Enter your choice:_

now, insert your original Windows XP CD, or Windows XP with sata ahci driver to your CD/DVD ROM
and back to Command Prompt window
type 1 then press Enter...
"Browse For Folder" window will appear, select your CD/DVD drive and click OK

the result... "XP Setup Source Path" changed to G:\ (yours may be different)

now for point 2, if letter T is currently assigned to a drive in your computer, you must change it.... if not, leave it as it is
how to change it?
type 2 and press Enter...
"Enter Available Virtual DriveLetter"
for example you doesn't have drive S
so you type S and press Enter
back to usb_prep8 welcome screen...
now type 3 and press Enter...
"Please give Target USB-Drive Letter e.g type U" Enter Target USB-Drive Letter:
because my Flash drive letter is H
so, type H and press Enter...
after back to usb_prep8 welcome screen...
now type 4 and press Enter to make new temporary image with XP LocalSource and copy it to USB Flash Drive
please wait a few seconds..

"WARNING, ALL DATA ON NON-REMOVABLE DISK DRIVE T: WILL BE LOST! Proceed with Format (Y/N)?"
type Y and press Enter
please wait....
when format virtual disk complete, press any key to continue...

please wait... making of LocalSource folder is in progress...

when "Making of LocalSource folder $WIN_NT$.~LS Ready"
Press any key to continue...

"Copy TempDrive Files to USB-Drive in about 15 minutes = Yes OR STOP = End Program = No"
Click Yes, and wait...

"Would you like USB-stick to be preferred Boot Drive U: bla... bla..."
Click Yes

"Would you like to unmount the Virtual Drive ?"
Click Yes, wait a few seconds, and press any key....
press any key again to close usb_prep8...

Now, your USB Flash Drive is ready... blogger-emoticon.blogspot.com
step 9:
Now, insert your USB Flash Drive/Flash Disk/Thumb Drive to your notebook (e.g Acer Aspire One)
go to BIOS and make USB HDD (or USB ZIP in some other machine) as primary boot device....
then boot form your USB Flash Drive....
and select "TXT Mode Setup Windows XP, Never unplug USB-Drive Until After Logon"

After Hard Disk detected, delete all partition, create single partition... and install Windows XP on that partition...
and wait...

once text mode setup is complete, computer will restart....
this time select "GUI Mode setup Windows XP, Continue Setup + Start XP"

Continue Windows XP setup.... and Done! blogger-emoticon.blogspot.com
Windows XP Installed....

Remember, you can use this tutorial to install Windows XP on all other computers.. not just Aspire One and Asus EEE-PC....